Now that the front head is installed, we can time the front camshaft.
The rear valve train is already timed, so we must time the front cylinder to both the crankshaft and to the rear camshaft.
We’ll use a wrench to rotate the engine from the left side.

If there’s too much slack in the cam chain, the cam chain will wrap around its lower sprocket and jam as the crankshaft is rotated, so we have to hold it up.

It’s simpler to loop the chain around a round socket than to try to hold the top of a moving chain.

The crankshaft is now at the rear (#1) cylinder’s timing mark, denoted by the ‘T’.

The rear (number one) camshaft is within one sprocket of its timing mark. This sprocket is pulled counterclockwise (as viewed here) one-half turn for each full turn of the crankshaft: the camshaft timing dot is nearest its timing mark in this position.
The camshaft timing dot hasn’t quite met its case mark, so it’s a little retarded: this is expected with a used chain. (Used chains are slightly longer.)

Starting from the rear (#1) cylinder’s timing mark, we’re advancing the crankshaft 285 degrees (about three-quarters of a turn) clockwise, as viewed from this side) to stop at the *front* (#2) cylinder’s timing mark. If we had turned the crankshaft *backwards*, we’d only have to move the crankshaft 75 degrees – but that would be opposite the normal direction of rotation. (The two cylinders are physically oriented 75 degrees apart on the crankcase.) (360 – 75 = 285 degrees)
(The crankshaft normally rotates clockwise when viewed from the left-hand side of the engine, and counter-clockwise when viewed from the right-hand side.)

We’ve stopped at the front (#2) cylinder’s timing mark, an unlabeled line.

This is a view of the rear (#1) camshaft when the engine is timed to the front (#2) camshaft’s timing mark. The rear camshaft has advanced (counter-clockwise) about three-eighths of a turn (142.5 degrees). (The camshaft rotation of 142.5 degrees corresponds with a crankshaft rotation of 285 degrees: 285 / 2 = 142.5)
The camshaft makes one rotation for every two rotations of the crankshaft. So, there are actually two rear camshaft positions that correspond with the front cylinder’s crankshaft timing mark:
Of these two camshaft positions, only the one that yields the larger cam degree difference between the front and rear camshafts is correct for this Yamaha engine.
(Generally, the larger the difference, the smoother the engine runs; the smaller the difference, the lumpier the engine runs.)
The crankshaft is still at the front cylinder’s timing mark, an unlabeled line. The rear cylinder’s timing mark, a ‘T’, is about 9 o’clock; the front cylinder’s timing mark, a single line, is about 11 o’clock.

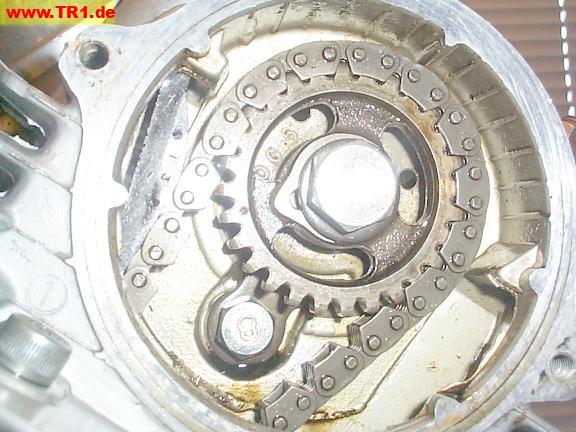
The timing gear dots for the front cylinder align. Cool.

To check the front (#2) camshaft’s timing mark, we’ll take the slack out of the chain on the *tensioner* (left) side of the chain, just as the cam chain tensioner would do. Since this sprocket is pulled clockwise by its chain, the sprocket mark is slightly *retarded* (with respect to the case timing mark): this is expected with a used chain.

The front cylinder’s rear cam chain guide, viewed from the tensioner hole.

The chain slack can also be removed by pushing on the guide with a finger.

The front camshaft timing looks good. We’re applying finger pressure on the left-hand cam guide (not visible) to keep the chain taut. Because the sprocket timing mark hasn’t quite reached the head timing mark, the camshaft is slightly retarded (not advanced).
When the engine’s running, the front cylinder’s sprocket is pulled clockwise (chains can’t push ;-).

We’ll add the front camshaft’s oil slinger, washer and bolt. It’s necessary to hold the oil slinger dimple (just above the bolt) positioned over the corresponding hole on the sprocket until the bolt is finger-tight.

We’ll prevent the alternator from moving (by holding it) while torquing the front camshaft bolt. Because the cam chain tensioner isn’t yet installed, the camshaft tends to turn a bit clockwise as the left chain loop became taut.

Before we can attach the cam chain tensioner to the cylinder, we must “wind it up” to retract the tensioner plunger into the body.
The plunger retracts into the tensioner body as we tighten the screw while simultaneously pushing down on the body.

The tensioner plunger is almost completely inside of the tensioner body after being wound up. It’s ready to be installed with a new gasket.
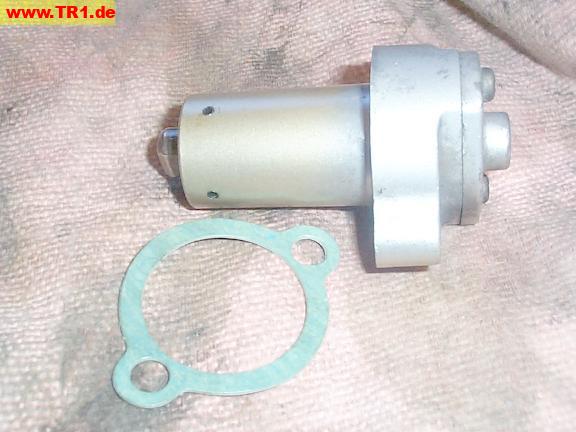
We’d like the tensioner gasket to stay intact if it ever has to be removed in the future, so we’ll apply a thin coat of oil to the mating surface.

We’ll also lubricate the tensioner bolts by dipping the threads in a capful of oil.

The tensioner is held in position by two bolts.

A slight push on the screw head activates the cam chain tensioner.

This little dust cover snapped into its hole over the adjustment screw with a furm push. Sometimes it’s necessary to shove the edge of the rubber cover into its hole with a tiny screwdriver.

The cam chain tensioner is done.

Let’s do a front timing check. The front cylinder cam sprocket timing marks line up within one sprocket’s width. Since the front sprocket is pulled clockwise, the timing appears slightly retarded, which is typical of a used chain.

Front timing check (continued). The front cylinder timing gear dots on the right-hand side of the engine are aligned.

Front timing check (continued). The timing window on the left-hand side of the engine shows the *front* cylinder’s timing mark, an unlabeled line.

Front timing check (continued). The rear camshaft is about 142.5 camshaft degrees (285 crankshaft degrees) past its timing mark. (The *rear* sprocket is pulled counterclockwise (when viewed from this side).) The front timing appears correct.
Yes!

As long as we’re here, we’ll torque both of the starter motor bolts to the right-hand case half. We could have done this any time after torquing the case halves together. We’re just getting around to it.

A front view of the starter motor.
